


The Morning Skincare Routine that Began my Glow-Up Journey
Operation FLMA: Feel Like Myself Again

After I realized I was struggling with a huge bout of burnout and headed down a healing path, the first step that I was able to take and stick to with fidelity was a solid morning skincare routine. This was an easy and logical first step to getting my glow back, because I was already in the habit of “doing skincare” in the morning; I just didn’t have consistency in the products I was using or a complete understanding of which products would actually provide results. I also didn’t know what order to use my products in for maximum effectiveness. The big issue with burnout is that while you’re in the thick of it, even if you are a high-achieving-still-showing-up-and-doing-all-the-things type of burnt-out, even the smallest and simplest things, like skincare can seem exhausting. Self-care often is the last thing on your list of priorities because you just cannot muster the energy to do it or even want to spend time with yourself in the mirror.
Once on the other side of burnout, I researched, planned, researched some more, and finally figured out the best morning skincare routine for my skin type. After implementing this routine, I began to see real results almost immediately, which was not only surprising but super encouraging. It helped me remain consistent. A month or so into this solid routine I began receiving compliments on my skin, which was even more encouraging. I kept a private little note in the Notes App on my phone with the compliments I received to fuel my fire. Now that it’s a solid habit, I cannot imagine going a day without my full regimen. I love spending that time with myself each morning, knowing that I’m investing in my skin health and doing the right things to make myself feel good. I start up my essential oils diffuser, pop on a fun playlist or podcast, and enjoy every moment of this self-care system.
Here’s a breakdown of what my skin needed:
1. Hydration - at the age of 42 this is a no-brainer, but I had to also recover from the diuretic that my doctor erroneously prescribed to me when I was at the height of health issues due to chronic stress. The water pill sucked all the moisture out of me and I had rough, dry, scaly skin from head to toe.
2. Brightening - because I was a teenager and young adult in the early 2000’s, I loved tanning, whether outside or in tanning beds (I know, I know!), and did so without a drop of sunscreen in sight (I know, I’m screaming!). I have hyperpigmentation from sun damage and acne scarring from the same era.
3. Texture Improvement - as mentioned above, I had major pimple problems as a teen and still have evidence of the cystic acne that I now know was due to a hormone imbalance even back then. Pair these pock marks with the beginnings of fine lines and wrinkles that occur from many years of public school teaching and you get yourself a fun little combo-platter of textured skin that makes for a very bumpy surface for makeup to sit on.
4. Sagging - very slightly around my mouth/chin area, some sagging marionette lines began to appear due to my sudden weight gain when my hormones decided to go bonkers and the way that I was sleeping (more on that, later!).
So I had these 4 areas of improvement in mind when I began my new routine, and here’s what worked to address them all:
Please note: as an Amazon Affiliate, I earn from qualifying purchases.
Step 1: Cleanse with an Oil Cleanser.
This loosens up and removes the skincare products from your nighttime regimen (more on that later, too!) without stripping your face of tons of moisture.
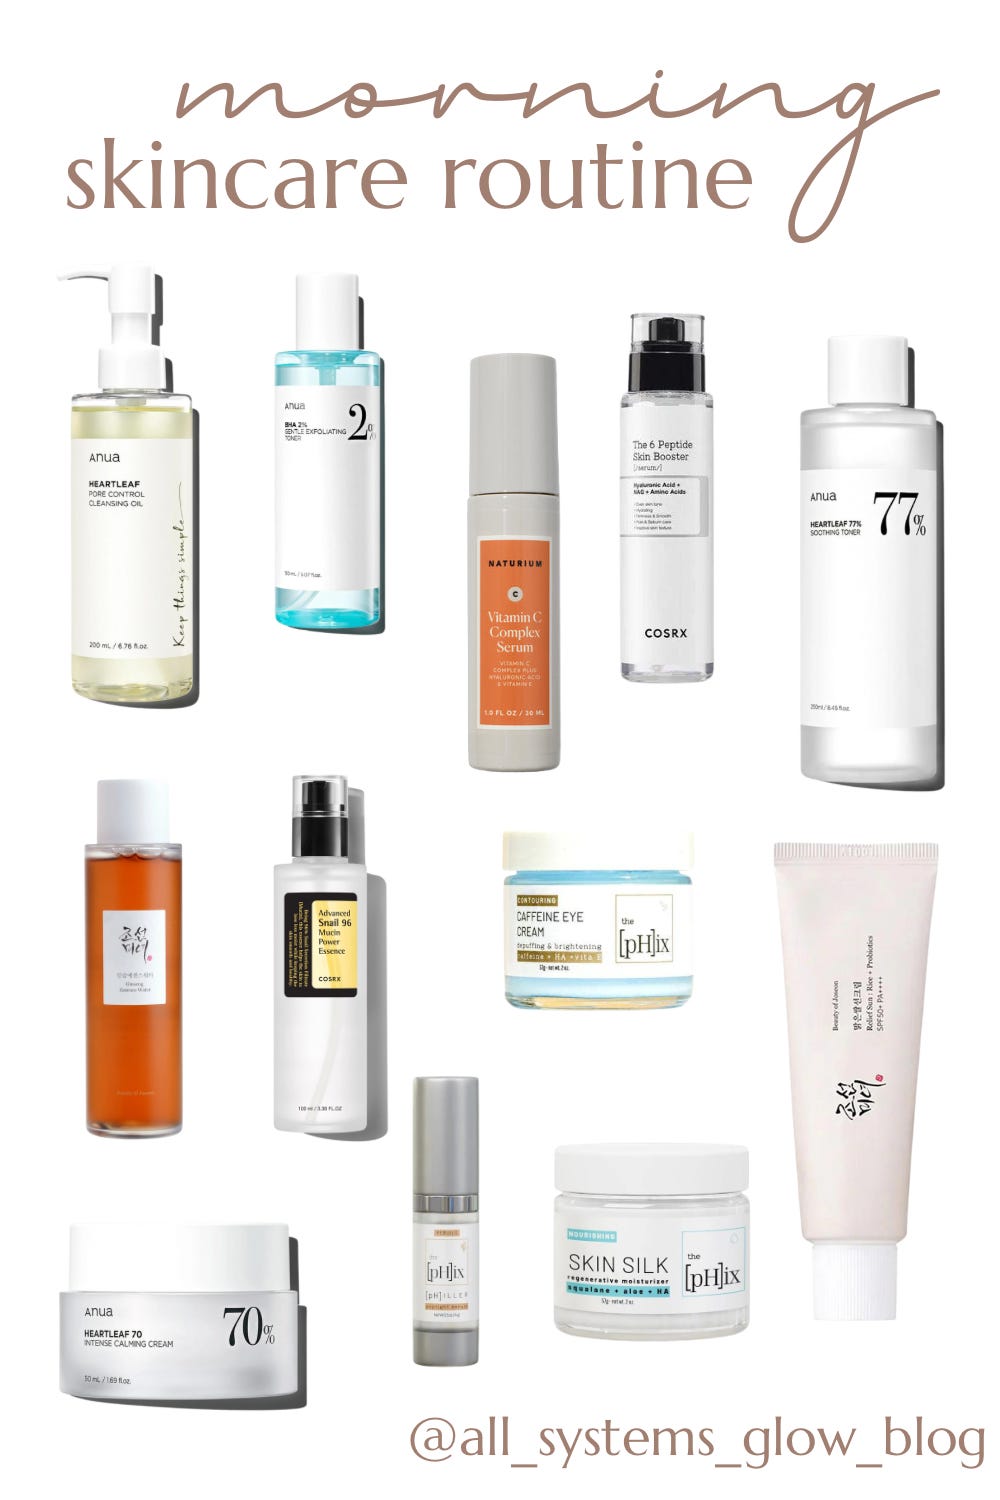
I love the Anua Heartleaf Pore Control Cleansing Oil for this step.
Step 2: Exfoliate with a Liquid Exfoliating Toner.
I did not originally start using an exfoliating toner until a few months in, and when I did… O. M. G. what a difference this made! Using an exfoliating toner as the step after cleansing really helps the subsequent products sink in and do their jobs. I was so impressed with the improvements that came with my skin texture after incorporating this step.
For this step, my go-to is the Anua BHA 2% Gentle Exfoliating Toner. I apply it with my hands, almost like you would a lotion, and it has worked wonders.
Step 3: Apply a Vitamin C Serum.
Vitamin C serums are recommended for morning skincare routines due to the many benefits they offer, including: hydration, brightening, reducing redness and hyperpigmentation, and protection against sun damage. It’s also safe for most skin types and universally recommended by dermatologists and estheticians.
I tried a lot of different Vitamin C serums before finding one that I loved for my skin; some caused some irritation or slight burning, and I learned that this is due to the Vitamin C serum not being formulated to be shelf-stable. Serums with Vitamin C can become unstable and break down when exposed to light, heat, air, and oxygen. This causes them to become less effective and can cause that burning sensation.
I fell in love with the Naturium Vitamin C Complex Serum for this step, after many a trial and error. The Naturium serum contains not only Vitamin C, but Vitamin E (which pairs perfectly with Vitamin C for maximum sun damage protection) and Hyaluronic Acid (which helps with hydration and plumping).
Step 4: Apply Peptides.
Peptides have an incredible amount of benefits including: antioxidant properties that protect your skin from environmental stressors like pollution and sun damage, collagen and elastin promotion that help minimize fine lines and wrinkles, skin barrier strengthening to help prevent weakening and damage in the future, redness and inflammation reduction, hydration improvement, and breakout prevention. Sign. Me. Up.
The COSRX 6 Peptide Skin Booster is my favorite product for this step. It includes peptides to target: collagen boosting and plumping, retexturizing, excess sebum and pore care, brightening, reducing skin sensitivity, and fine line smoothing and firmness.
Step 5: Apply Toner.
There have been some wonderings around toner: is it really necessary? Does it really do anything? For me, the answer is YES. It’s both necessary and does something. It does exactly what it says it does - it tones!
For this step, I really love the Anua Heartleaf 77% Soothing Toner. It’s lovely. It hydrates, soothes, and calms. With all the action I was taking on my face, I welcomed the soothing and calming qualities, and I was all about flooding my face with hydration that it so needed.
Step 6: Apply Ginseng Essence Water.
This is a step that is totally optional but I like to include. Ginseng Essence Water is just a luxurious addition to any skincare routine to provide extra glow. It’s hydrating and calming, much like the toner mentioned above, but there’s something about the ginseng that just gives skin that extra oomph to break dullness and bring radiance.
I use the Beauty of Joseon Ginseng Essence Water for this step and it has been a staple since Day 1 of incorporating this routine.
Step 7: Apply Essence.
If you haven’t picked up on it yet, my routine is highly influenced by the tenets of Korean Skincare. When I began this glow-up journey, I wanted a routine that included products that were super clean, without any harmful ingredients that were known cancer-causers or endocrine-disruptors. After getting my hormones balanced, regulating my nervous system, and de-stressing my life, I didn’t want to incorporate anything that would potentially disrupt that again. Korean Skincare is known for being clean, with gentle products that produce beautiful results. “Essence” is a Korean Skincare term that describes products that are sort of like if a toner and a serum had a baby. There are different types of essences, but in general, they target problem areas and prep skin for more concentrated products. The most well-known essence is probably snail mucin, which gained popularity in the U.S. a few years ago. And that’s exactly what I use here.
My favorite snail mucin essence is the original gangsta for glass skin: COSRX Snail Mucin 96%.
Step 8: Apply Eye Cream.
As we get older, the first place that wrinkles begin to form is usually around the eyes, and therefore a good eye cream is key.
My favorite eye cream for daytime is the [pH]ix Caffeine Eye Cream. It’s formulated to combat puffy, tired eyes, fine lines and wrinkles, and dark under eye circles, and it lives up to the hype. Plus, the owner and creator is an all-around wonderful human who created the [pH]ix to help his mom who was going through cancer treatments, so I’m a fan for life.
Step 9: Apply Moisturizer.
Once you apply all of the products above, you have to seal it all in with a nice, super-hydrating moisturizer that will last throughout the day.
For this step, I love the Anua Heartleaf 70% Intense Calming Cream. It’s quite thick, so a little goes a long way and keeps your skin hydrated all day long.
Step 10: Apply Filler Peptide Serum.
This is another luxurious optional step that I love and cannot live without. Filler peptides visibly tighten and firm the skin, so I use it directly on the areas that I feel are more wrinkly or sagging. I’ve seen incredible improvements in my marionette-line area since using this product.
My absolute favorite filler peptide comes from the [pH]ix line again. It’s the [pH]ix [pH]iller Peptide+ Serum. This went viral on TikTok, and for good reason. People were calling it Botox in a bottle!
Step 11: Apply Lightweight Moisturizer.
This is another optional step that adds to the luxury of my regimen. Because the filler peptide tightens the skin so well, I’ve found that adding in a light, silky moisturizer afterwards helps my makeup go on more smoothly. While this step is not necessary at all, I do prefer to include it rather than not, to get the smoothest texture possible.
My favorite lightweight moisturizer for this step is the [pH]ix Skin Silk.
Step 12: Apply Sunscreen.
This step is absolutely NOT optional. You have, have, HAVE to apply sunscreen as your final skincare step. This is the most effective way to prevent future sun damage, wrinkles, discoloration, and skin cancer. Don’t skip it!
My favorite sunscreen is the Beauty of Joseon Relief Sun Rice + Probiotics SPF 50+. It doesn’t leave a white cast on the skin and sits really nicely under makeup, almost like a primer!
If you’ve made it this far on this blog post you’re probably thinking “Dang girl. That’s a lot. How long are you in that bathroom every morning?!” And I get it! Before I was un-burnt out and interested in investing time in myself for self-care, I would have looked at this list and said “Immediately no, immediately no. I’ve seen what I needed to see…” and scrolled on by. But I promise that spending time with yourself is part of the process and the results have been so rewarding. Each step really only takes 30 seconds to a minute to apply and once you have the routine down, the time flies.
However, if you’re starting out and looking for a pared-down routine that will just get you going without all the bells and whistles above, I would recommend the following:
Step 1: Cleanse.
Step 2: Exfoliate.
Step 3: Apply Vitamin C Serum.
Step 4: Moisturize.
Step 5: Apply Sunscreen.
That’s it! Dermatologists and estheticians alike agree that those are the non-negotiables. Once you get the basics down, you can add in any toners and serums that you feel will target the areas that need help.
The key is finding out which steps will work for you to be the most consistent, because only then will you see the benefits.
Happy glowing!
- L